Timing is everything. When it comes to sanding, it isn’t just about carrying out the procedures. You have to act at the right time. The difference between a great job and one that is bad can be down to timing.
Apart from time, techniques and quality of products are also essential. However, on our scale of preference, timing comes first. Why is this?
In getting that desired glossy and uneven surface without orange peels and scratches, timing is of the essence. As a result, how long to wait before wet sanding clear coat becomes a point of utmost consideration.
What Is Wet Sanding
It involves the use of lubricants, thereby reducing the amount of dust present. The idea behind the use of liquid is to lubricate. The lubricating effects of the liquid will help remove unwanted particles stuck under the grit. This helps to avoid orange peel.
The liquid options could range from water, detergent, to more advanced options. An example of a more advanced option is WD-40.
![WD-40 Multi-Use Product with SMART STRAW SPRAYS 2 WAYS, 14.4 OZ [2-Pack]](https://m.media-amazon.com/images/I/51zKbE6lzrL.jpg)
Water with a bit of car wash detergent is generally a good lubricant. If you are not sure about the type of lubricant to use, the option of water and detergent will do almost anything in this regard.
What Is a Clear Coat
Originally, the idea of painting metallic surfaces was to protect it from rust. Metal bridges and surfaces were coated to make them durable. However, the invention of colored layers of paint changed the rule. Although it still protects the metallic surfaces, it adds glamour with its glossy look and feel.
The Clear Coat?
This is the last layer of paint usually applied to cars, as well as some other metallic surfaces. Most car manufacturers use this paint to achieve a desirable glossy and even surface for their products. Over ninety percent of car manufacturers make use of this paint.
As a result of its glossy and transparent feature, some clear coat products have thin layers. However, the paint’s thickness is largely dependent on the manufacturer.
Although it is a great option for a nice look, it may not be used. If it must be used, there must be more than one layer of paint before the clear coat is applied. This is very important in achieving the overall aim of applying the product.
As stated earlier, the clear coat cannot be solely used as the car paint. It is just an optional addition to the underlying layers of paint.
To bond with the panel’s material, a base coat is used to prime. Afterward, colored paint is used over the base coat. Depending on the purpose, other colored layers of paint may be used. Ultimately, the clear coat is used.
The maintenance of the clear coat requires the wet sanding procedure as explained before now.
If you prefer a visual explanation of this article, below is detailed and helpful video.
Video: How Long to Wait Before Wet Sanding Clear Coat (Timely Details – Part 1)
How Long to Wait Before Wet Sanding Clear Coat
And here we are, getting to answer the question of the day. How much patience is required before you can wet sand a clear coat? Well, truth be told, there is no definite time to do this. However, depending on the product and other factors, the clear coat should be allowed time before wet sanding.
What are these factors responsible for how much time is needed?
Let us examine crucial factors that will determine the waiting time between the clear coating and wet sanding.
The Nature of the Orange Peel
The first time we heard the term orange peel, it sounded like something we would love. Well, for guys like us, eliminating orange peels is our job. This requires the progressive use of sandpaper grits from small to large-sized grits.
As harmless as the clear coating process seems, there is the possibility of orange peels. These are uneven scratch-like surfaces that are left behind during the coating process. The severity of the orange peel can be down to either the painter or the paint used.
If you are a newbie or inexperienced in clear coating, you might want to try out with pieces of stuff in the junkyard. This way, you will have mastered the act before venturing into critical items like cars and the likes.
Also, the specific brand of clear coat used can determine how much orange peel is possible. In short, how does orange peel affect the waiting period before wet sanding?
The amount and severity of orange peels influence the waiting time before wet sanding. The waiting time for a small amount of orange peel differs from a large amount.
In that regard, you should look up the new clear-coated item and see how much orange peel you have got. This will largely determine the waiting time before wet sanding. Also, do not forget that the essence of wet sanding is to eliminate orange peel.
The Kind of Clear Coat Product Used
We have slightly discussed this in the previous factor. The waiting time before wet sanding is not universal for all products. Some brands have a very thick coat, as against others with thinner or medium coat density. These variances will influence the waiting time before wet sanding.
Also, some products do well to add relevant information to the label. They give suggestions as to the waiting time. You can do well to check the label for such information.
However, never use the waiting time of one product, as a yardstick for another. To a large extent, they are made with varying properties or amounts of these properties.
Air Temperature
Hand painting is becoming very obsolete. It is like browsing with a 2G network. The bottom line is that the use of automated spray guns has become the norm for a while. As a result, the working features of these equipment have to be considered.
You should understand that automated spray guns work with pressure. The intensity of the pressure means you have a thicker or thinner layer of clear coat.
Lots of products suggest air temperature ranges for the process. This is to validate the crucial importance of the working spray gun in the eventual turn out of the painted work.
Haven explained the various factors influencing the waiting time, you see there is no definite timing. However, as a general rule, professionals would advise you do not wet sand in a hurry.
In this regard, it is better to act late than too early. This is because damage is likely done when you wet sand before the required time. Some professionals advise that you wait for about 24 hours or largely through the night.
Well, the idea is so the wet coat has sufficient time to dry and take it course before wet sanding. Also, caution is equally important during the wet sanding process. The right amount of pressure and lubricant is non-negotiable.
Lastly in this regard, there is a clear difference between wet sanding and waxing. This also applies to the waiting time. Most often, waxing can take about 90 days after the coating process. However, it is also not a compulsory rule.
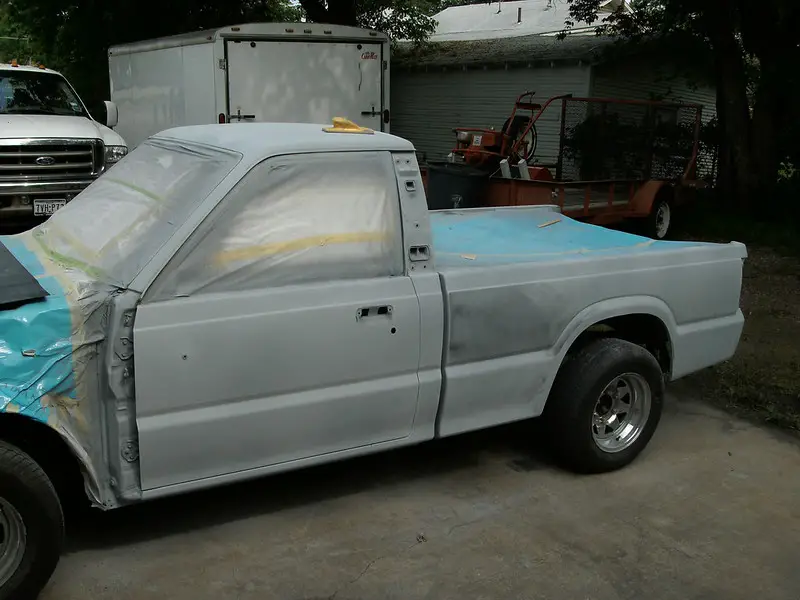
Wet Sanding – The Process
When talking about sanding general body works, wet sanding is an important subject to discuss. Bearing that in mind, let us talk about the process involved in wet sanding. For instance, how much of sandpaper grit is involved, and how they are to be used.
The Sandpaper and Grit Sizes
Before then, knowledge of the sandpaper grit is particularly important. What do the numbers indicated on various sandpaper mean? For example, what makes a 1500 grit sandpaper different from a 1000 grit sandpaper.
Alright, sandpaper is to sand as the pen is to write. The sandpaper has two sides. One part has an abrasive surface central to the sanding procedure. It is the abrasive part that evens out odd and uneven surfaces.
How about the grit size?
The sandpaper comes with various numbers attached to it. For instance, you can see an 800 grit, 1000 grit, 2000 grit, and so on. The question is, what do the numbers tell us?
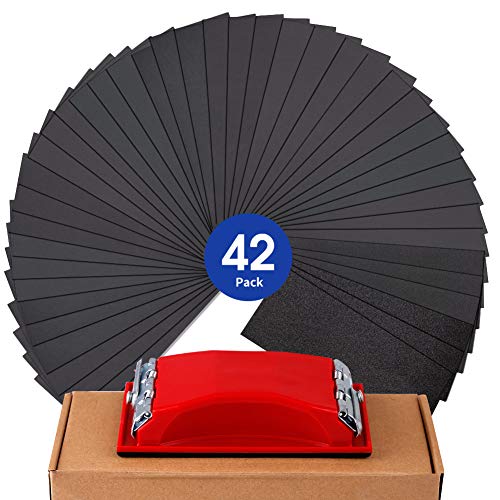
The bigger the grit number, the finer the abrasive surface of the sandpaper. On the other hand, the smaller the number, the more course the abrasive surface of the sandpaper.
With this understanding, you should know that a 1500 grit sandpaper is finer than a 1000 grit sandpaper. In like manner, a 2000 grit sandpaper is finer than a 1500 grit sandpaper.
The sandpaper is not only used for metallic surfaces. Items such as wood, also get to be sanded. Some wood surfaces are sanded with incredibly low grit sandpapers, working their way up to larger ones.
For instance, a critical sanding project on a solid hardwood floor may use as low as 40-grit sandpaper. Gradually, it would be worked up to about 150 grit. At 40-grit, even as a starting point, this is almost impossible for a metallic surface such as a car.
To be practical, at most, sanding a car can kick off with about 500 grit and progress up to 2000. The choice is heavily dependent on the aim of the sanding process.
For example, when wet sanding clear coat, you are merely trying to correct a few and slight scratches. As a result, you should not use extremely low grit sandpapers. Usually, something around 800 – 1000 grit size can start the process.
You clearly can tell some of the differences between wood and metal in this regard. Haven explained the idea behind the grit numbers, let us get on with the process of wet sanding general body works.
What Do You Need for Wet Sanding
Have it in mind that this is not just about sanding, you will also be buffing. The essence is to give the sanded area a glossy and appealing sight. It light of this, what are the items that you will need for wet sanding? These items are listed below:
- Water
- Various Grit Sandpaper

- A bucket

- A Rag to be soaked in soapy water
- A clean cloth for drying and wiping
- A Buffer with low RPM

- Car wash detergent or advanced wet sanding chemical

Wet Sanding – The Procedure
For the sake of being specific, the wet sanding procedure will center around wet sanding your car’s clear coat. We think this is great for illustration, especially given the subject we are discussing. So, in a series of steps, this is how you should wet sand a car’s clear coat:
Soak the Sandpaper
You will need to soak the sandpapers into a liquid solution. Timing is also of the essence here. For an effective job, we strongly recommend that you soak 1 hour before wet sanding.
This way, the sandpaper gets lubricated and softened enough for what is coming next. As regarding the properties of the liquid solution, this could range from water, detergent, to more advanced options such as WD-40.
Water with a bit of car wash detergent is generally a good lubricant. If you are not sure about the type of lubricant to use, the option of water and detergent will do almost anything in this regard.
It Is Better Off Clean
Ensure the car is in the right shape for wet sanding. Get the exterior of the car thoroughly washed. If possible, you can make it down to the car wash for this purpose. Among many things, this is to make sure you are not interrupted by dust.
Make Out a Dry Clean Car Exterior
Not only do you get to wash the vehicle with soap and water, but you also need to dry it afterward. As much as a clean exterior is required, you need a dry surface for wet sanding. This is asides from the lubricant used for wet sanding.
Use a clean dry cloth to dry off the wet surface of the washed car. As a warning, do not allow the car to dry off itself. This is especially if you are situated in a sandy or dusty environment.
This will defeat the purpose of washing in the first place. Therefore, you should dry the car with a clean cloth immediately after washing.
A Soaked Rag
You will also need a rag soaked in slightly soapy water for this procedure. The amount of soap should be minimal. You do not need an exceptionally large amount of it. For 2 liters of water, you can use 1 full cap of the detergent.
Below is a visual explanation of how to wet sand and buff your car.
Video: How To wet sand and buff your car
The Sanding Begins
The sanding process should be highly selective. Start with a smaller part and work your way to other parts of the job. There is a definite size for the sanding.
That should be determined by what is convenient for you. However, do not be carried away. Ensure that every part that needs to be sanded is touched.
The Sanding Pad Is the Ideal Tool
There are moments the power sander gives you an edge. However, now is not the time. Rather, you should stick to using the sanding block or pad. Essentially, this is important in the overall turn out of the wet sanded surface.
The use of the sanding pad helps the sanded segments align with the surface of the panel. This way, you have the desired even look and feel for the car’s exterior.
About Sandpaper Grit Size
As earlier explained, the idea is starting with a smaller grit and progressing to larger sized grit. However, the precise grit size to start with is dependent on the nature of the job.
However, on a whole, you can start with something around 500-grit sandpaper. Gradually, you work your way up to 1500 grit sandpaper.
How Much Hand-Pressure is Required
When wet sanding, you do not need too much pressure. By applying too much pressure, you may do more harm than good, as that can eat deep into the clear coat.
As a reminder, the aim is not to remove the clear coat, it is to make it look better. In other words, apply little pressure with your hands. Also, aside from your hand, do not apply body weight while sanding.
Practically, you are to work with your 2 hands. One hand should hold the wet rag lubricating the sanded surface. The other hand should hold the sandpaper and the sanding pad. Do not sand in haste as you should occasionally observe the progress.
Buffing Is Next in Line
It just does not end with sanding, as buffing is an integral part of the whole process. After sanding the needed area, you will observe a dull looking surface ready for the next stage, buffing.
What effect does buffing have on the vehicle?
This is a good question to start with. Buffing will help you remove or minimize little scratches caused by harsh natural conditions. However, it is equally important during wet sanding as it plays the same role.
Furthermore, without buffing, the sanded exterior will look dull and unattractive. The first thing to do is to choose the right rubbing compound. Various choices can be made in this regard. Your level of expertise can also be a huge determinant of the rubbing compound.
For experienced hands and professionals, Buffermaster is a good choice. On the contrary, newbies and inexperienced buffers can use Dewalt, among others.
Using the Buffer
The RPM is related to buffing as grit size is related to sanding. In that light, you should be particular about buffing with the appropriate RPM.
Here is how the RPM works. When you buff with a low RPM, there is less friction, as well as heat build-up. On the contrary, a higher RPM would translate to intense friction and heat build-up.
At the very least, you should start buffing with a low RPM, even if you will increase it. Also, the RPM required when using the rubbing compound is different from when finishing. You can start somewhere around 1400.
As a warning, do not keep the buffer in a stagnant position when buffing. This can create something you are not prepared or able to deal with.
Also, to prevent the adverse effect of heat build-up on the surface, less pressure is important. Just allow the buffer to take the full course as you guide it with your hands.
Keep the Buffer Running While It Is Needed
This calls for top-notch preparation. Before using the buffer, ensure you have all required to getting it running as long as required. This also includes a sufficient amount of rubbing compound.
As a warning, the buffer should be kept running for as long as needed. If it goes off or is short on the rubbing compound, there may be a need for re-sanding or re-clearing previously sanded surface.
Protecting the Wet Sanded Surface
The wet sanding procedure is not a stroll in the park. It takes time and effort. Furthermore, under the right circumstances, it does not have to be a usual occurrence. To avoid the possibility of wet sanding earlier than expected, you can do a couple of things.
For starters, the cleaner your vehicle, the less the need for wet sanding. Next, you can periodically wax your vehicle as this helps a lot. After waxing, you can choose to slightly buff the exterior. However, this is a very optional procedure.
When Wet Sanding Does Not Cut It
To a certain extent, wet sanding rectifies dents and scratches on the panel’s surface. However, there are times the procedure does not help or help enough.
For instance, when your clear coat is peeling. At this point, there is little or nothing wet sanding can do to salvage the situation. As a result, you will need more intensive actions such as repainting the panel.
Final Note
As it stands, you can now answer the question of how long to wait before wet sanding. This is particularly important in getting the right look for the surface concerned. Also, the process of wet sanding and buffing has been explained in detail. You should understand how wet sanding requires patience and attention to detail. Therefore, be particular about getting the right result against doing a horrible job.
